A recent blog post from Olimex pointed to a document [1] showing how to debug the Intel Galileo board using a JTAG. The nice thing about the document is that it assumed the user would be building their own image using Bitbake/OpenEmbedded. The unfortunate part is that the Galileo BSP downloads from Intel are so ancient they have next-to-no chance of working on a recent, modern distro. Their instructions, however, do point this out (i.e. ...this procedure was performed on <some old version of> Ubuntu...), leaving the user little choice but to start by preparing a VM in which to perform the build!
Back when the Galileo board was released, Intel did a great job of supporting it by creating various layers to be used with OpenEmbedded: meta-clanton, meta-galileo, meta-intel-iot-devkit, meta-intel-iot-middleware, meta-intel-quark-fast, meta-intel-quark. But, as you can see, that support was a bit "scattered". On top of that, it doesn't look like meta-clanton was ever placed somewhere public; the only way to get it (and to build for the Galileo) was to download a massive BSP from Intel which included it. Over time this massive download was replaced by a smaller download, which then required you to run a script which would pull in all the sub-components as a separate step (which performed the massive download). Additionally, a fixup script needed to be run in order to clean up some of the build area before you could start your build. Attempting any of this procedure on a modern Linux development host is very likely to fail.
Fast-forward to today (June 26, 2016) and all that's needed to create an image for the Galileo are a distro layer, the basic OE meta layer, and meta-intel. Or, if you're using poky as your distro, you'll get the meta data as part of it.
Building An Image for the Galileo
$ mkdir /some/place$ cd /some/place
$ mkdir layers
$ pushd layers
$ git clone git://git.yoctoproject.org/poky meta-poky
$ git clone git://git.yoctoproject.org/meta-intel
$ popd
$ . layers/meta-poky/oe-init-build-env galileo
Now, edit conf/local.conf so that
MACHINE ?= "intel-quark"
EXTRA_IMAGE_FEATURES ?= "debug-tweaks tools-debug tools-profile"
And edit conf/bblayers.conf to replace the part that says "meta-poky/meta-yocto-bsp" with "meta-intel".
Now run:
$ bitbake core-image-minimal
When bitbake starts it prints some build configuration information. For my build I saw:
Build Configuration:
BB_VERSION = "1.31.0"
BUILD_SYS = "x86_64-linux"
NATIVELSBSTRING = "SUSELINUX-42.1"
TARGET_SYS = "i586-poky-linux"
MACHINE = "intel-quark"
DISTRO = "poky"
DISTRO_VERSION = "2.1+snapshot-20160622"
TUNE_FEATURES = "m32 i586-nlp"
TARGET_FPU = ""
meta
meta-poky = "master:6f0c5537e02c59e1c8f3b08f598dc049ff8ee098"
meta-intel = "master:1b98ae6d7e10390c9ecb383432593644a524f9c8"
If your build fails, one thing you could try is to go to each of the layers and checkout the commits specified in the above information; then restart the build.
At the end of a successful build, continue with the following to create an SDcard image:
$ bitbake parted-native
$ wic create mkgalileodisk -e core-image-minimal
Look through the wic output, it will tell you where it has placed its artifact. Use dd to create your SDcard with the wic artifact:
# dd if=/var/tmp/wic/build/mkgalileodisk-<datetime>-mmcblk0.direct of=/dev/sdX bs=1M
Cross-GDB
Eventually you're going to use GDB, via openOCD, to debug your target. In order for this to work (in addition to openOCD) you're going to need two things:- a gdbserver "stub" running on your target
- a cross-GDB running on your development machine
Above, as part of your first build, I mentioned that you needed to adjust the EXTRA_IMAGE_FEATURES variable of your conf/local.conf file. One of the things that change does is to include the gdbserver stub in your target image.
In order to build a native cross-GDB for your development host you'll need to generate an SDK for your image:
$ bitbake core-image-minimal -c populate_sdk
Once built, you then need to install the SDK. To do so, simply run the resulting SDK script which you'll find in ${TMPDIR}/deploy/sdk. The install script will ask you where you want to install the SDK; type in a path and press Enter, or simply press Enter to accept the default.
Once installed, source the SDK environment file:
$ . <SDK_INSTALL_LOCATION>/environment-setup-i586-nlp-32-poky-linux
OpenOCD
My recommendation is to get, build, and install the latest OpenOCD from sources:$ mkdir <SOMEPLACE_TO_BUILD_OPENOCD>
$ cd <SOMEPLACE_TO_BUILD_OPENOCD>
$ git clone git://git.code.sf.net/p/openocd/code openocd
$ cd openocd
$ ./bootstrap
$ ./configure
At the end of ./configure'ing, the script will print out a list of all the dongles for which it can include support. Reasons why it can't include support for a particular dongle may include the lack of additional required libraries. If a particular dongle is marked as un-buildable and you want to build support for that dongle, you'll need to figure out the reason(s) why it can't presently be built (i.e. figure out which library it needs) and fix the deficiency (i.e. use your host distribution's package manager to install that library's -dev/-devel package). The ./configure script is pretty good at telling you which library/libraries are missing.
Once the configuration is done:
$ make -j
$ sudo make install
Connecting to the Galileo via JTAG and GDB
Two terminals are required for this part. In one terminal you'll run OpenOCD and in the other you run the cross-GDB (or telnet).To run OpenOCD you'll need to tell it to which board you're connecting, and which dongle you're using. Obviously the board part will remain the same, but the dongle part for you might be different depending on whether or not you're using the same dongle(s) as me. Also, the order in which this information is given to OpenOCD is important. Apparently you need to specify the dongle first, then the board.
In the following example I'm using the Segger j-link EDU:
# openocd -f interface/jlink.cfg -f board/quark_x10xx_board.cfg
Open On-Chip Debugger 0.10.0-dev-00322-g406f4d1 (2016-06-22-09:29)
Licensed under GNU GPL v2
For bug reports, read
http://openocd.org/doc/doxygen/bugs.html
Info : auto-selecting first available session transport "jtag". To override use 'transport select <transport>'.
adapter speed: 4000 kHz
trst_only separate trst_push_pull
Info : No device selected, using first device.
Info : J-Link V9 compiled Apr 15 2014 19:08:28
Info : Hardware version: 9.00
Info : VTarget = 3.354 V
Info : clock speed 4000 kHz
Info : JTAG tap: quark_x10xx.cltap tap/device found: 0x0e681013 (mfg: 0x009 (Intel), part: 0xe681, ver: 0x0)
enabling core tap
Info : JTAG tap: quark_x10xx.cpu enabled

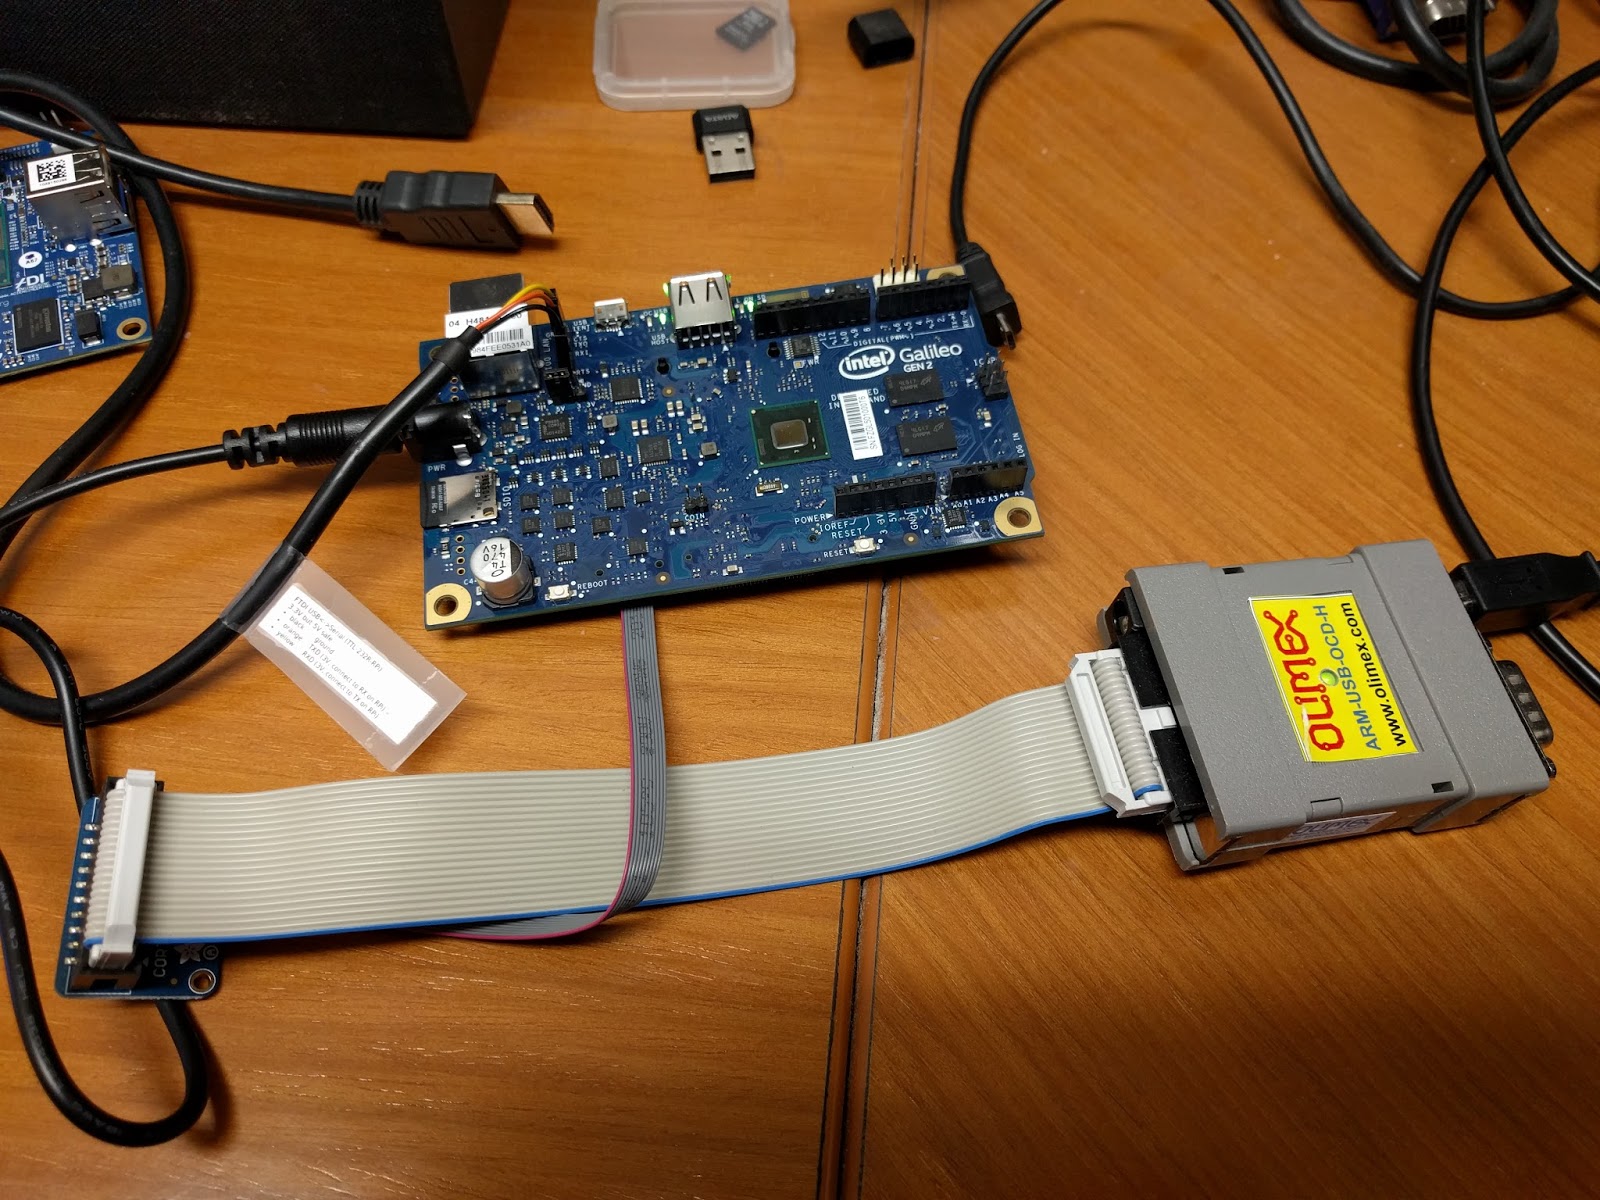
In this example I'm using the ARM-USB-OCD-H from Olimex:
# openocd -f interface/ftdi/olimex-arm-usb-ocd-h.cfg -f board/quark_x10xx_board.cfg
Open On-Chip Debugger 0.10.0-dev-00322-g406f4d1 (2016-06-22-09:29)
Licensed under GNU GPL v2
For bug reports, read
http://openocd.org/doc/doxygen/bugs.html
Info : auto-selecting first available session transport "jtag". To override use 'transport select <transport>'.
adapter speed: 4000 kHz
trst_only separate trst_push_pull
Info : clock speed 4000 kHz
Info : JTAG tap: quark_x10xx.cltap tap/device found: 0x0e681013 (mfg: 0x009 (Intel), part: 0xe681, ver: 0x0)
enabling core tap
Info : JTAG tap: quark_x10xx.cpu enabled
Now, to communicate with and control the board via OpenOCD you need to open a second terminal. If you want to simply send commands to OpenOCD (such as to check or flash the board) you can simply use telnet:
$ telnet localhost 4444
Trying ::1...
telnet: connect to address ::1: Connection refused
Trying 127.0.0.1...
Connected to localhost.
Escape character is '^]'.
Open On-Chip Debugger
>
If you want to debug the target via GDB then you need to startup the cross-GDB and connect it to OpenOCD from within GDB itself (note: the cross-GDB should be already on your $PATH, it comes from the SDK we built and installed earlier; if it's not on your PATH you may have forgotten to source the SDK's environment file, see above):
$ i586-poky-linux-gdb
Python Exception <class 'ImportError'> No module named 'operator':
i586-poky-linux-gdb: warning:
Could not load the Python gdb module from `sysroots/x86_64-pokysdk-linux/usr/share/gdb/python'.
Limited Python support is available from the _gdb module.
Suggest passing --data-directory=/path/to/gdb/data-directory.
GNU gdb (GDB) 7.11.0.20160511-git
Copyright (C) 2016 Free Software Foundation, Inc.
License GPLv3+: GNU GPL version 3 or later <http://gnu.org/licenses/gpl.html>
This is free software: you are free to change and redistribute it.
There is NO WARRANTY, to the extent permitted by law. Type "show copying"
and "show warranty" for details.
This GDB was configured as "--host=x86_64-pokysdk-linux --target=i586-poky-linux".
Type "show configuration" for configuration details.
For bug reporting instructions, please see:
<http://www.gnu.org/software/gdb/bugs/>.
Find the GDB manual and other documentation resources online at:
<http://www.gnu.org/software/gdb/documentation/>.
For help, type "help".
Type "apropos word" to search for commands related to "word".
(gdb) target remote localhost:3333
Remote debugging using localhost:3333
Python Exception <class 'NameError'> Installation error: gdb.execute_unwinders function is missing:
0x00000000 in ?? ()
(gdb)
[1] Source Level Debug using OpenOCD/GDB/Eclipse on Intel Quark SoC X1000, sourcedebugusingopenocd_quark_appnote_330015_003-2.pdf